I mistyped my blog address in my email signature, switching the "s" and the "p" in "blogspot" and have inadvertently been sending countless people to a Mega Bible Studies site that seems to exist solely for people who mistype "blogspot."
My apologies for the inconvenience, and my kudos and gratitude to anyone who found there way here in spite of that. I've fixed it.
Wednesday, December 13, 2006
Monday, December 11, 2006
Up and About
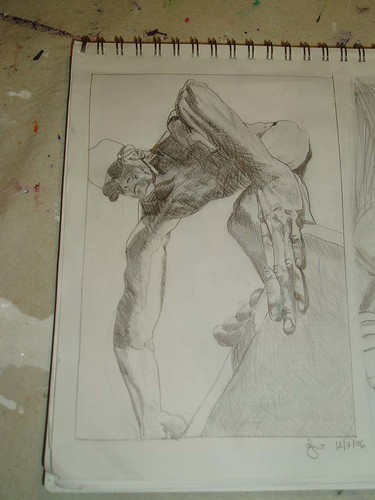
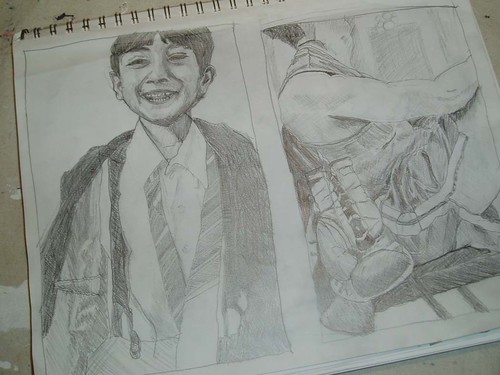
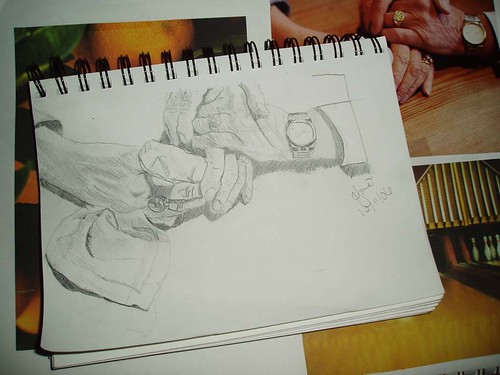
Being couch-bound has its advantages, and although it took me a while last week to accept that I had to just sit down and let myself convalesce, once I did, the week actually became pretty pleasant. I wrapped myself up in blankets, drank a lot of hot tea, hot chocolate and instant vanilla lattes, and drew.
I worked on cross-hatching, practicing what I learned in the drawing class Al and I took recently. The class, which was based on this book , brought together many of the ideas I had been exposed to in previous art classes, but this time everything sort of clicked. I learned to see differently. I learned how to put myself in a right-brain frame of mind. I learned how to draw what I see and not what I think I see. And as a result, I think that my drawings are fundamentally better; now it's a matter of putting in the hours to get my skills where I want them. And a lot of patience. Which I was forced to have this past week.
Now I am up and about, for the most part. Not yet at a hundred percent, but a lot better and glad for it. So I'll be working on getting some new designs up in the Cafe Press shop this week, I hope in time for last-minute Christmas shopping.
I worked on cross-hatching, practicing what I learned in the drawing class Al and I took recently. The class, which was based on this book
Now I am up and about, for the most part. Not yet at a hundred percent, but a lot better and glad for it. So I'll be working on getting some new designs up in the Cafe Press shop this week, I hope in time for last-minute Christmas shopping.
Wednesday, December 06, 2006
One thing down...
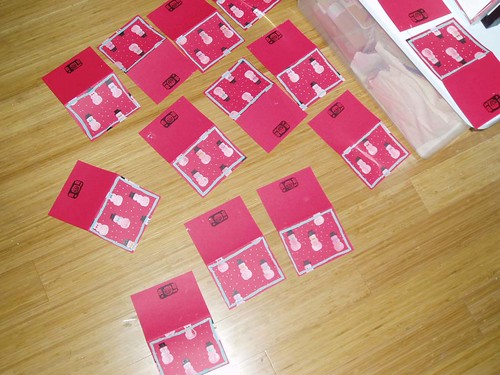
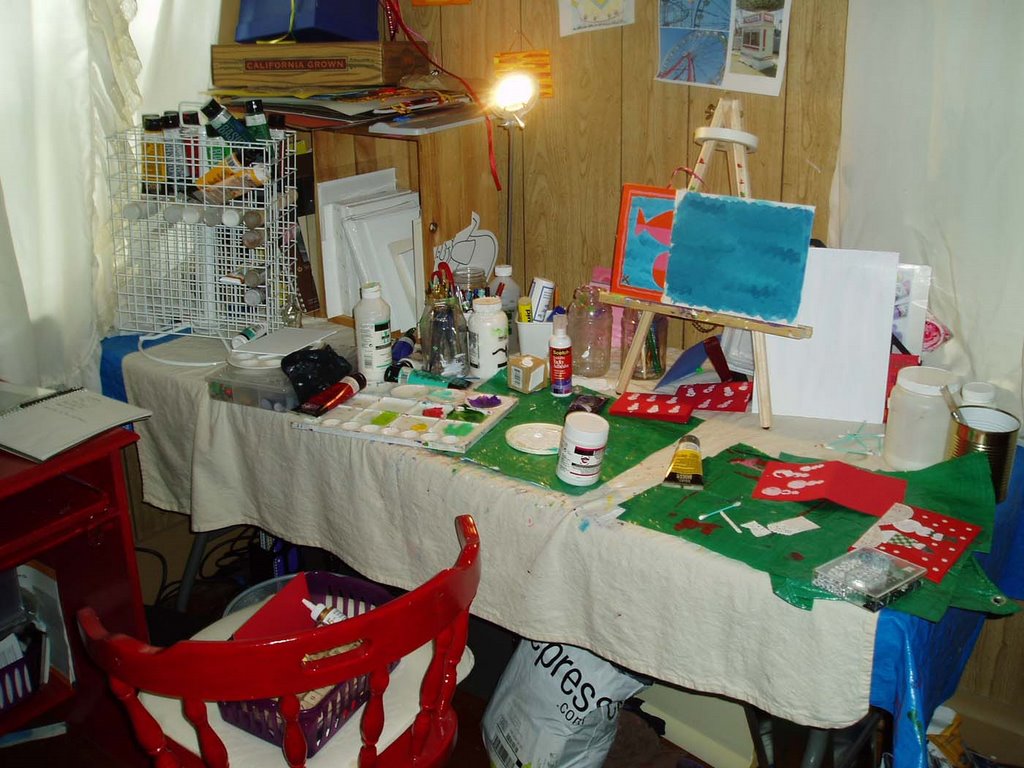
I was hoping to catch up on some work this week, but the bronchitis is back and has bowled me over (how's that for alliteration?), so it's back to sleep it off for me. However, I did finish one commission this week for 40 Christmas cards, and I am quite pleased with them.
Up on the clothesline to dry:
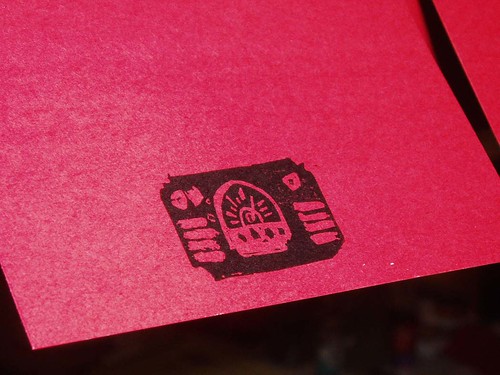
 I carved myself a new logo stamp (I like the irregular woodblock feel):
 And added some aqua trim:
Tied them up, nice and pretty with the only ribbon I could find (my huge bag of ribbons has gone missing in the move back into the office. How this is possible, I do not know. Our house is not big):
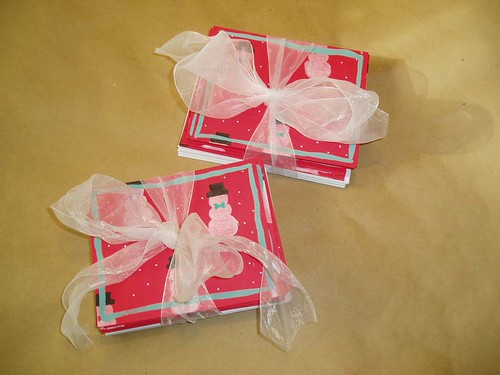
Fortunately, I had some raffia too:
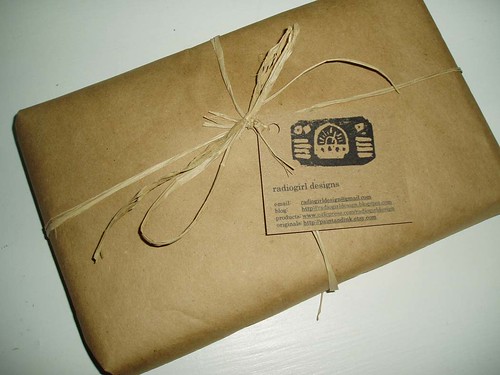
And there you have it. I'll be taking the package to the post office this afternoon. I am very pleased with that tag -- it was a spur-of-the-moment creation and I like it so much I am going to use the same design for new business cards.
I hope that I'll be able to get fully back into the swing of things by the end of this week. I'm itching to get back to work and I have two more commissions waiting in the wings (the commissioners of which have been very patient, and I thank them profusely).
Up on the clothesline to dry:
I carved myself a new logo stamp (I like the irregular woodblock feel):And added some aqua trim:Tied them up, nice and pretty with the only ribbon I could find (my huge bag of ribbons has gone missing in the move back into the office. How this is possible, I do not know. Our house is not big):
Fortunately, I had some raffia too:
And there you have it. I'll be taking the package to the post office this afternoon. I am very pleased with that tag -- it was a spur-of-the-moment creation and I like it so much I am going to use the same design for new business cards.
I hope that I'll be able to get fully back into the swing of things by the end of this week. I'm itching to get back to work and I have two more commissions waiting in the wings (the commissioners of which have been very patient, and I thank them profusely).
Friday, December 01, 2006
Guess WHAT??!!
I'm back in the studio. WHEW.
HOORAY!
Okay, so there are still a few last details left unfinished. Like outlet covers. But I could. not. wait. another. day. So we moved all the furniture back in, and I am happily ensconced in a room that is visually much warmer and more inviting that I could have dreamed when we began the project, even without outlet covers (and curtain rods). All I really thought we were going to do was raise the foundation and get rid of that nasty paneling. Instead, we created something very special.
Many thanks to the people who helped us along the way, to family and friends who have been so understanding and forgiving while my brain has been dust-clogged, and to all of you have been so encouraging and interested in the goings-on. You all made it much easier and more pleasant to endure.
And of course, a very big thank you to my husband, Al, who, after all, raised a house all by himself.
Finally, a special shout-out to Gus the Cat, who was shut up in various rooms in the house throughout the process, and still manages to purr when I pick him up.
So....
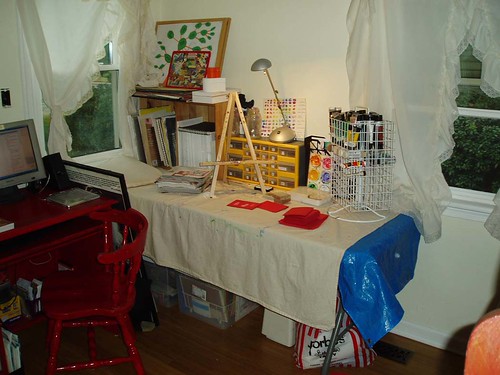
This was my office/studio on Friday, October 13:

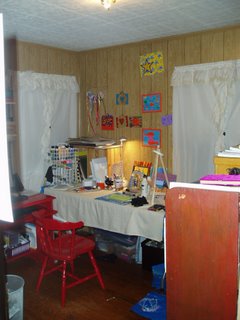
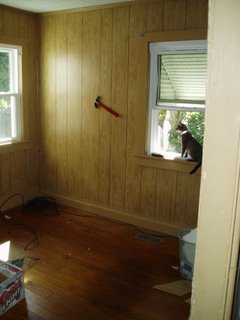


 (Should have turned the light on for this one. Sorry.)
With the furniture in, it looks exactly the same on camera, but it actually doesn't in person-- this camera with its overbearing flash does not do this room justice -- but Al and I have been discussing getting new furniture, anyway, perhaps a corner ensemble that will work as both computer desk and painting table to go in this corner.
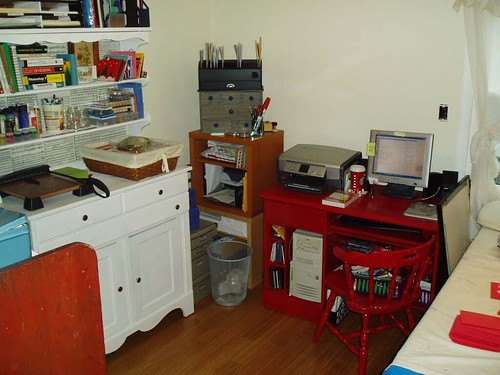
In the meantime, I tried different arrangements to see if I could keep the cat off the painting table on his way to look out the windows, but to no avail. The furniture just wouldn't fit any other way (the room is only 9 feet by 9 feet). So I gave in.

And here's my new storage cabinet where I wanted to put it originally. It is covered in the sheet music for Beethoven's Ninth Symphony, and I was careful that the very first page in the upper left corner be the beginning of "Ode to Joy," because I think every piece of furniture should bring a little joy:

And where it ended up, across the room (all nine feet of it):

I will post more detailed pictures and different angles, along with before shots of the cabinet, which are worth seeing, in a separate post soon.
HOORAY!
Okay, so there are still a few last details left unfinished. Like outlet covers. But I could. not. wait. another. day. So we moved all the furniture back in, and I am happily ensconced in a room that is visually much warmer and more inviting that I could have dreamed when we began the project, even without outlet covers (and curtain rods). All I really thought we were going to do was raise the foundation and get rid of that nasty paneling. Instead, we created something very special.
Many thanks to the people who helped us along the way, to family and friends who have been so understanding and forgiving while my brain has been dust-clogged, and to all of you have been so encouraging and interested in the goings-on. You all made it much easier and more pleasant to endure.
And of course, a very big thank you to my husband, Al, who, after all, raised a house all by himself.
Finally, a special shout-out to Gus the Cat, who was shut up in various rooms in the house throughout the process, and still manages to purr when I pick him up.
So....
This was my office/studio on Friday, October 13:

 (Should have turned the light on for this one. Sorry.)
With the furniture in, it looks exactly the same on camera, but it actually doesn't in person-- this camera with its overbearing flash does not do this room justice -- but Al and I have been discussing getting new furniture, anyway, perhaps a corner ensemble that will work as both computer desk and painting table to go in this corner.
In the meantime, I tried different arrangements to see if I could keep the cat off the painting table on his way to look out the windows, but to no avail. The furniture just wouldn't fit any other way (the room is only 9 feet by 9 feet). So I gave in.
And here's my new storage cabinet where I wanted to put it originally. It is covered in the sheet music for Beethoven's Ninth Symphony, and I was careful that the very first page in the upper left corner be the beginning of "Ode to Joy," because I think every piece of furniture should bring a little joy:
And where it ended up, across the room (all nine feet of it):
I will post more detailed pictures and different angles, along with before shots of the cabinet, which are worth seeing, in a separate post soon.
Tuesday, November 21, 2006
Seeing Stars Again
My first bit of press. So exciting. Many thanks to Jules of ikea hacker.
My full directions for this project are here...
Yesterday, I realized there was one more thing in the office left undone, so I drywalled the closet... (cue music now)... All By Myself. I am so proud of my inner contractor. Now I have only to primer and paint the closet, and together we must cut and paint the molding and trim for the room, and hang a few shelves... and then we're done. The holiday weekend and impending obligations may or may not interfere, but I think we're in single digits now, so that I should still be back in the office by the beginning of next week. What a relief it will be to really get back to work, and to have all of my supplies at my fingertips again.
Not to mention having the rest of the house back from its current state as storage facility.
Monday, November 20, 2006
So close...
We finished laying the floor last night and now we have only to cut and paint molding and window trim and put up outlet covers, etc. We'll most likely do this on Friday, and I should be back in the studio before the weekend is over. I am so excited.
The floor looks absolutely gorgeous.
Of course, now I'll need new furniture. I'm refinishing one storage item right now, about which I am very, very excited. I'll post pictures of that when it's in place.
Next, once we have all of the debris out of the garage, I want to build a custom painting table. Since I have no experience building furniture (if you don't count trying to make a prefab desk that didn't work, work), I want to keep it as simple as possible for now, so I think I will start with something like this. I'd like to add another drawer and I'd like to extend the top out further so it is more of a desk than a table. But I like the basics of it very much and it will give me an excuse to use the new miter saw and the table saw I talked Al into buying (as if he needed that much persuading... but he was trying to stick to the budget while I just kept insisting it would pay for itself. I think it already has.).
Tuesday, November 14, 2006
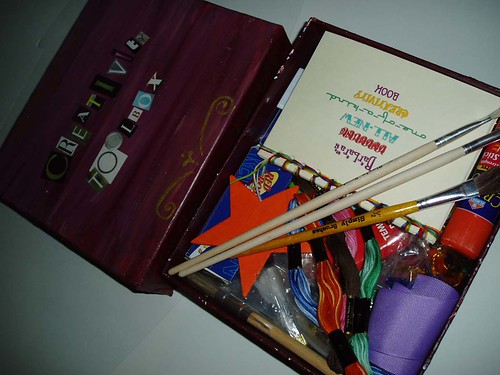
Out of the Box
My mom said to me on a recent visit, "I wish I were creative like you."
I know for a fact that my mother is creative -- I've seen evidence of it in her home. And I believe everyone is creative naturally, but some people just don't know how to access that creativity.
So I decided to give my mom some tools to jump-start her creativity and I concocted a gift for her:
I put a quote in the bottom of the box by Wassily Kandinsky:
There is no must in art because art is free.

I raided my own stash of supplies for sequins, embroidery thread, and other embellishments. I added new paints, brushes and a palette tray.
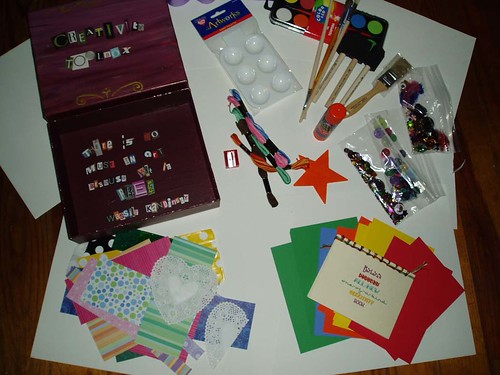
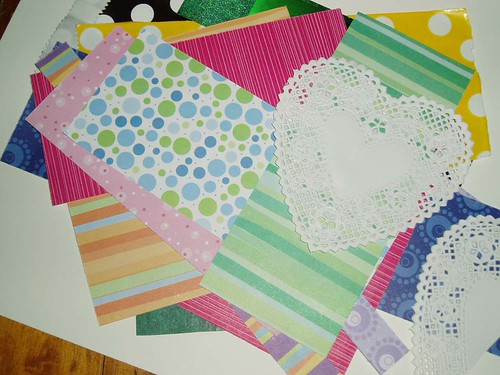
I picked out some fun and pretty papers:
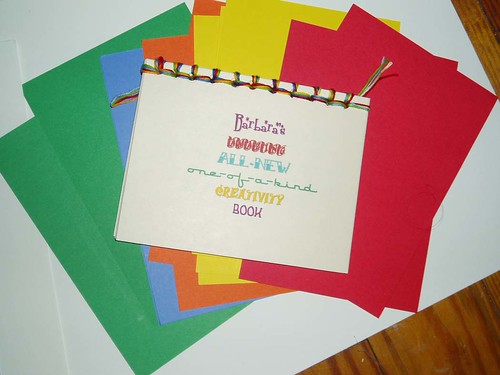
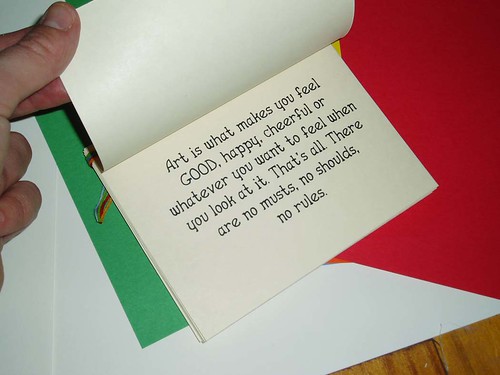
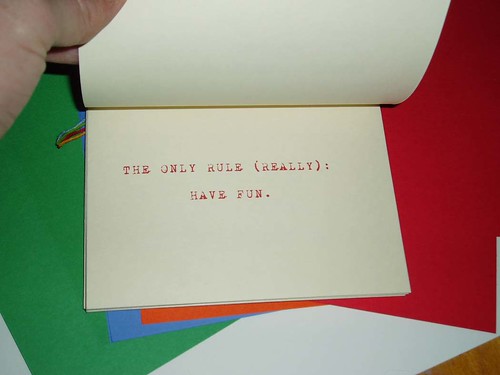
And then I made her a guidebook.
I threw in some more quotes from famous artists and added some tips on how to be creative:
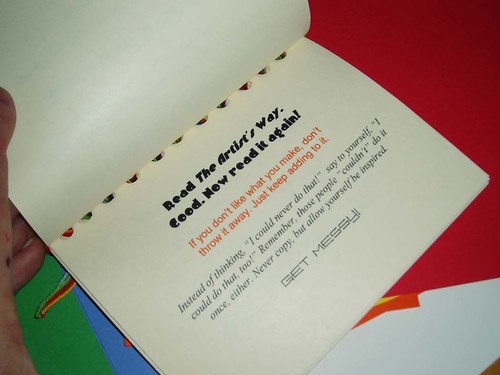
And I made up some "rules."
I don't know if she'll ever use it, but I think she really liked it.
I know for a fact that my mother is creative -- I've seen evidence of it in her home. And I believe everyone is creative naturally, but some people just don't know how to access that creativity.
So I decided to give my mom some tools to jump-start her creativity and I concocted a gift for her:
A Creativity Toolbox
I put a quote in the bottom of the box by Wassily Kandinsky:
There is no must in art because art is free.
I raided my own stash of supplies for sequins, embroidery thread, and other embellishments. I added new paints, brushes and a palette tray.
I picked out some fun and pretty papers:
And then I made her a guidebook.
I threw in some more quotes from famous artists and added some tips on how to be creative:
And I made up some "rules."
I don't know if she'll ever use it, but I think she really liked it.
Thursday, November 09, 2006
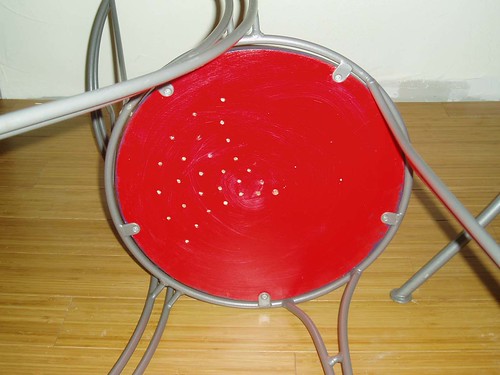
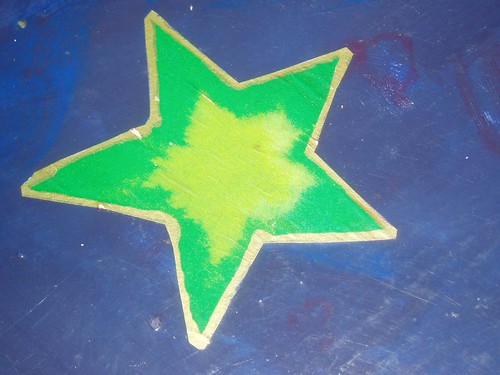
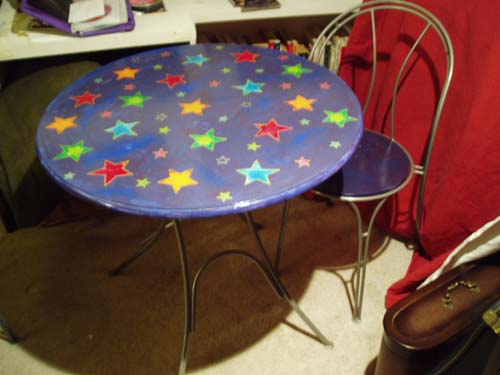
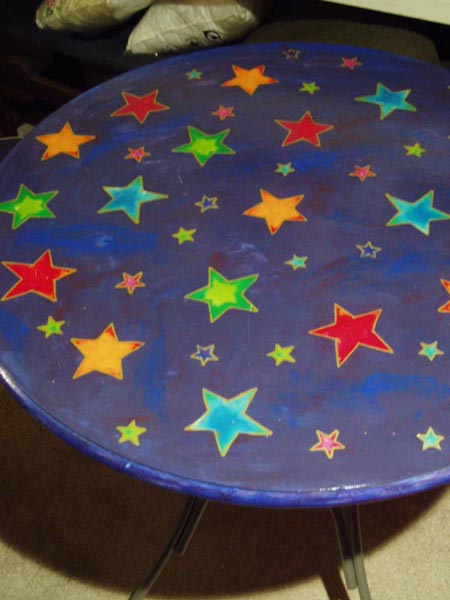
Oh, Starry Table, how I love thee
I am delighted and honored that Jules of Ikea Hacker invited me to write up the instructions for my star table. They are a little long, but they are in reality very simple, and I hope, inspiring. This is the project that, ahem, ruined me. That is, I cannot look at a piece of furniture anymore without wondering how I can make it better, more interesting, or totally mine.
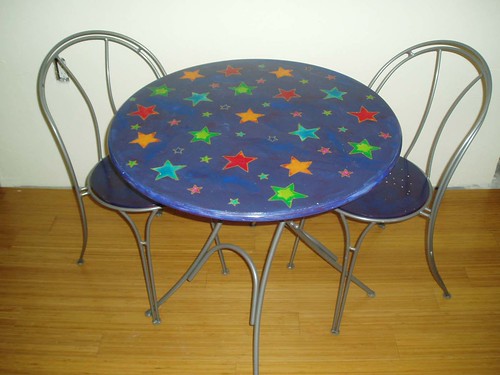

This was my first decoupage project ever and I did it on the fly with a few materials I was given for free. I just did it because I thought I could. I didn’t do a lot of research into decoupage, nor did I worry too much about the process as I was doing it. Since then, I have tried a variety of decoupage techniques, but I find the simpler, the better, and I tend to use these very same steps. I am always learning, though.
The table was a hand-me-down from someone who purchased it at Ikea, but I can’t find it any longer on the Ikea site and, sadly, I’m too far away to go look for myself. But these techniques should work with any wood furniture. If you're really attached to the furniture and/or a perfectionist, you may wish to practice on something else first.
Supplies needed:
table and chairs, sandpaper, paper cutouts to be decoupaged, gesso, acrylic paints, glue (Mod Podge or other decoupage glue), polyurethane, brushes
The simple steps:
1. Take everything apart and sand the wood.
2. Cover with gesso and then paint.
3. Glue paper shapes to the painted surfaces with mod podge.
4. Varnish with many layers of polyurethane.
The detailed steps:
Preparation:
1. Unscrew table top from base and chair seats from frames.
2. Lay the table top and seats on a tarp or other okay-to-get-paint-on-it surface.
3. Sand wood lightly.
Painting:
4. Cover all to-be-painted surfaces with gesso.
(If you’re unfamiliar with gesso, it’s acrylic primer found in art/craft stores and pronounced “jesso,” as I learned when I had to buy it the first time for myself and asked for “gesso” with a hard “g.” In my opinion, you don’t need expensive gesso, paint or brushes for this project. Buy them cheap. I used the cheap black foam brushes and threw them away when I was done.)
5. Paint all to-be-painted surfaces with as many coats as you need to achieve the hue you want. Let dry between each coat, unless you want to blend colors, in which case, apply the colors at the same time.
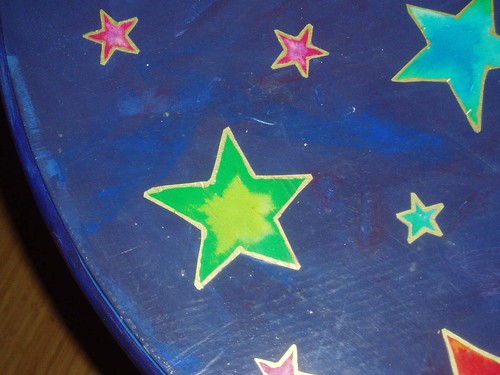
(I used only blue and red on this. I painted the underside of the table and chair seats red and let them dry. Then I painted the top surfaces with both colors: I mixed the blue and red on a tray to make purple, then blotched together red, blue and purple on the table, and blended them to get the look I wanted. I also went for a scratchy look, which has been great as I've moved the table from place to place - any dings looks sort of intentional. To know the drying time for each coat of gesso, paints, glue and polyurethane, read the manufacturer’s instructions.)

Decoupage:
6. Cut out the paper pieces while the paint dries.
(I cut these stars out of wrapping paper. I really like using wrapping paper, because it’s so thin that, if you get bubbles as the paper gets wet with glue, you can sort of crush them out with your hand. You will usually end up with a crinkly effect, but I like that look, and at the end, the finish will make the whole table very smooth to the touch. If you want it to look and be smooth from the start, try heavier paper and carefully smooth it out from the inside to the outer edge. If you use magazine cutouts, be warned that the text or images on the back might be visible through the paper.)
7. Spread Mod Podge or some other decoupage glue over the surface in a thin but total layer. Lay the paper pieces on the table in the arrangement you want. Spread another thin layer of the glue/podge on top of the paper pieces. Let that dry.
(If you do see bubbles you don’t want after the glue dries, the recommended technique is to cut a tiny “x” with a craft knife and push a little glue down there before putting the “x” back together so that the edges of the x overlap. I have tried this with mixed results. As for the glue, different decoupagers have their favorite products, such as wallpaper paste, spray adhesives and others. I like Mod Podge, and have not had any problems with it)
Finish:
8. Finally, I coated everything with three or four thin layers of polyurethane. This is the part of the process that takes the longest, because of drying times between coats.
(I used Anita’s Water Clean-Up Polyurethane and found that an 8 oz. jar was more than enough for this one project, but you can buy a gallon of polyurethane at a paint store if you like. The very best thing about this finish is that every time I’ve discovered a water ring or such on the table, I have just brushed another coat of polyurethane on the table and the mark has gone away.)
9. I recommend waiting at least 24 hours to use it even if the whole thing is dry to the touch.
Wednesday, November 08, 2006
Almost Finished...
Well, the delay in finishing the studio/office renovations has lengthened by weeks thanks to Other Things Happening, but we have been working as hard as we can, and we are so close to being done, I can smell it. Oh, wait, that's the glue I'm smelling.
The last drywall screw goes in. Whew. I'm not saying I wouldn't hang drywall again. But I'm glad this batch is done.
This was before we realized the drywall tape really wasn't staying down.
So we had to come up with a solution. And that was to make stucco! I like stucco. Stucco reminds me of California, which I miss every day. Now I have California inside. This is just the beginning of the finish, before the textured paint was added.

This is after -- and the best shot I have with a realistic depiction of "Honey Moon." Ah, so rich and warm and buttery and honey-like. And it has no lead in it, so if I get hungry, I can lick the walls. Which I might do. I like the paint that much.

There are tremendous benefits to being married to an electrician. One, he can teach me to do cool things, like installing outlets (me being a girl who shocked herself installing an extra phone jack). Two, if I don't feel like risking life and limb playing with wires, he'll do it. Thank you, honey.

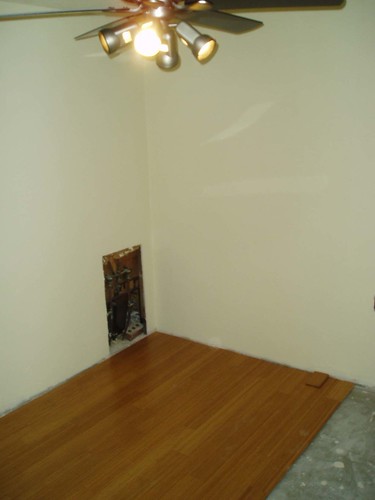
The ceiling fan has a remote. Amazing. Of course, our ceilings are so low, I can touch them while barely even reaching, and the chain for the ceiling fan nearly brushes my head. But just in case my arm hurts, there's a remote.
 I don't think this looks like me, but I do think I look skinny in this picture, so I'll keep it.
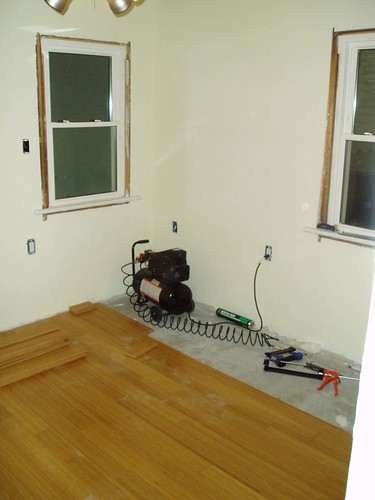
 Down goes the first row.

On Day One of floor-laying, we learned that two humongous tubes of glue don't go very far. We had to stop and then buy a CASE of glue tubes the next day.
This is where we are now. The last few rows have to be mitered to fit in with the strangely angled staircase, so we had to call it quits for the day. And now our plans will be postponed again as we must go out of town this weekend. But we're almost done.
 A complete set of photos can be found here. These aren't for the faint-hearted. There are 69 of them.
The last drywall screw goes in. Whew. I'm not saying I wouldn't hang drywall again. But I'm glad this batch is done.
This was before we realized the drywall tape really wasn't staying down.
So we had to come up with a solution. And that was to make stucco! I like stucco. Stucco reminds me of California, which I miss every day. Now I have California inside. This is just the beginning of the finish, before the textured paint was added.
This is after -- and the best shot I have with a realistic depiction of "Honey Moon." Ah, so rich and warm and buttery and honey-like. And it has no lead in it, so if I get hungry, I can lick the walls. Which I might do. I like the paint that much.
There are tremendous benefits to being married to an electrician. One, he can teach me to do cool things, like installing outlets (me being a girl who shocked herself installing an extra phone jack). Two, if I don't feel like risking life and limb playing with wires, he'll do it. Thank you, honey.
The ceiling fan has a remote. Amazing. Of course, our ceilings are so low, I can touch them while barely even reaching, and the chain for the ceiling fan nearly brushes my head. But just in case my arm hurts, there's a remote.
I don't think this looks like me, but I do think I look skinny in this picture, so I'll keep it.Down goes the first row.On Day One of floor-laying, we learned that two humongous tubes of glue don't go very far. We had to stop and then buy a CASE of glue tubes the next day.
This is where we are now. The last few rows have to be mitered to fit in with the strangely angled staircase, so we had to call it quits for the day. And now our plans will be postponed again as we must go out of town this weekend. But we're almost done.
A complete set of photos can be found here. These aren't for the faint-hearted. There are 69 of them.
Tuesday, November 07, 2006
Experiments in Interdependence
Leave well enough alone? Oh, guess what. I am not capable of that. I must always tweak and alter and change.
So I am adding a blog to the RadioGirl web site family (and hope very soon to have one ring to rule them all... oh, sorry... I meant, one main web site with my own domain to be RadioGirl Headquarters... I'm working on it now).
Anyway, as I was saying, this new blog, I am RadioGirl, will be an offshoot of this "professional" blog, RadioGirl Designs. I am sometimes extremely disorganized, and sometimes organized to the point of overdoing it (overcompensation, you know), but in the long run, I think it will be easier if I keep the "random-thoughts-dreams-opinions-hilarious discoveries" and the "professional" stuff connected but still independent from each other... or perhaps the best word is interdependent.
It may become a bit of a hassle to maintain two blogs (three, actually, if you include my husband's and my personal blog, which is entirely separate), but I am looking forward to the challenge. This move will free me to write about things that I do want to share with others, but don't necessarily feel fit perfectly here on RadioGirl Designs. That is... this is the show, and that's
It's an experiment. One of my all-time favorite words. An experiment in interdependence.
(and if you pop over there now, you can read the story of the RadioGirl name...)
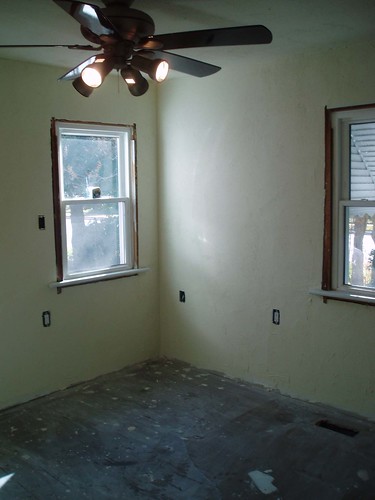
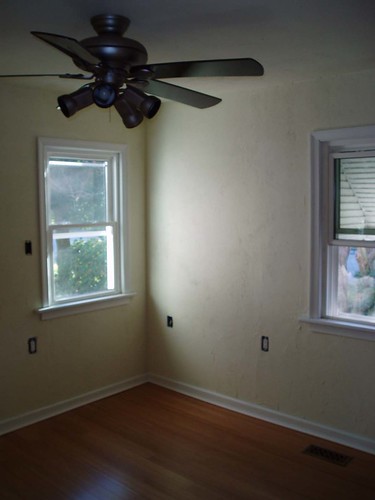
One exception to this separation of material will be the continuing renovation of my studio/office, which is very nearly done. I promise I will post more pictures here soon. Today, I hope. It looks amazing - better than I ever dreamed - and it is still visibly incomplete. I am bubbling with excitement and anticipation of how it will look when finished.
So I am adding a blog to the RadioGirl web site family (and hope very soon to have one ring to rule them all... oh, sorry... I meant, one main web site with my own domain to be RadioGirl Headquarters... I'm working on it now).
Anyway, as I was saying, this new blog, I am RadioGirl, will be an offshoot of this "professional" blog, RadioGirl Designs. I am sometimes extremely disorganized, and sometimes organized to the point of overdoing it (overcompensation, you know), but in the long run, I think it will be easier if I keep the "random-thoughts-dreams-opinions-hilarious discoveries" and the "professional" stuff connected but still independent from each other... or perhaps the best word is interdependent.
It may become a bit of a hassle to maintain two blogs (three, actually, if you include my husband's and my personal blog, which is entirely separate), but I am looking forward to the challenge. This move will free me to write about things that I do want to share with others, but don't necessarily feel fit perfectly here on RadioGirl Designs. That is... this is the show, and that's
It's an experiment. One of my all-time favorite words. An experiment in interdependence.
(and if you pop over there now, you can read the story of the RadioGirl name...)
One exception to this separation of material will be the continuing renovation of my studio/office, which is very nearly done. I promise I will post more pictures here soon. Today, I hope. It looks amazing - better than I ever dreamed - and it is still visibly incomplete. I am bubbling with excitement and anticipation of how it will look when finished.
Monday, October 30, 2006
By the letters S and W
S is for scrapbooking
When I lived in Germany in 1991 and Prague in 1995, I kept scrapbooks, one in each place. They were pretty simple. This was shortly before the explosion of scrapbooking as a serious hobby (or perhaps, the re-explosion), and although I decorated the pages a bit, my focus really was on keeping a visual record of what I did while I was in those places, to supplement my journals, as opposed to making intricate layouts. And I'm glad I have them, because they do help me remember. Maybe one of these days I will post some pictures.In the meantime, however, you can take a look at the scrapbooks of L.M. Montgomery, one of my two very favorite authors (the other is Madeleine L'Engle).
W is for work, writing and walls
Today I go back to work on a freelance writing job, so my entries may or may not be sporadic.
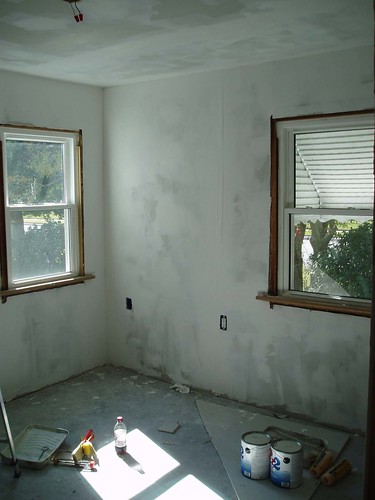
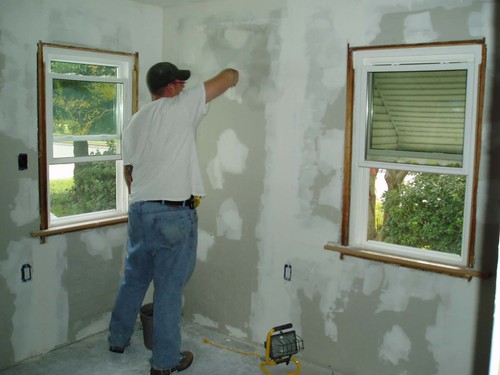
The office hit another snag this weekend, but one which I believe we solved. We primed the walls and still found that we could see the drywall tape through the walls and it looked awful. So we came up with a solution which I think is beautiful but which took us an extra day to implement. Pictures to come. Now we are on track to prime tonight, paint tomorrow and, I hope, lay the hardwood flooring over the next week, in pieces each evening after we are both finished work. Thank you to everyone for your kind comments and encouragement!
Welcome...
... to my little sister, Olivia, born October 29, 2006.
I look forward to building a great friendship across the 31 years that divide us.
Love,
Alison
I look forward to building a great friendship across the 31 years that divide us.
Love,
Alison
Saturday, October 28, 2006
Glue Ikea to Art
Take a look at this:
This to That
Wish I'd known that existed a lot sooner. And what a perfectly named web site.
And this:
Ikea Hacker
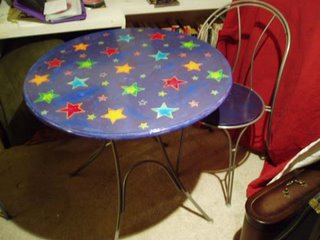
which makes me very happy. I've "hacked" much furniture, but the table below is one of the things that I know came from Ikea originally (although I wasn't the one who made the purchase; it was a hand-me-down, but I was the one who decoupaged it). I actually miss Ikea for the little things and cheap curtains, a lot, even though I swore I'd never buy Ikea furniture again after a certain disaster with a should-have-been-beautiful desk.
I adore this table, though. It is my single favorite piece of furniture that I own.

This to That
Wish I'd known that existed a lot sooner. And what a perfectly named web site.
And this:
Ikea Hacker
which makes me very happy. I've "hacked" much furniture, but the table below is one of the things that I know came from Ikea originally (although I wasn't the one who made the purchase; it was a hand-me-down, but I was the one who decoupaged it). I actually miss Ikea for the little things and cheap curtains, a lot, even though I swore I'd never buy Ikea furniture again after a certain disaster with a should-have-been-beautiful desk.
I adore this table, though. It is my single favorite piece of furniture that I own.
Monday, October 23, 2006
I can't get the dust out of my clothes.
Sometime soon, I will be back in my "honey moon"-painted painting (and everything else) studio, and I hope to bring you REAL befores and afters then, but here's what we've done so far.
The 9 days we had set aside to fix our foundation, gut the office/studio and refinish it, and replace the bathroom floor have passed, and we have accomplished ALMOST everything we intended to do. We would most likely be done -- we were two days ahead at one point -- but I got very sick early on, and missed about two days, and was only at 50 percent for another day or two.
Here's a sample of our progress. The rest of the photos are here.
At the beginning, there was a cart. And then there were five carts.

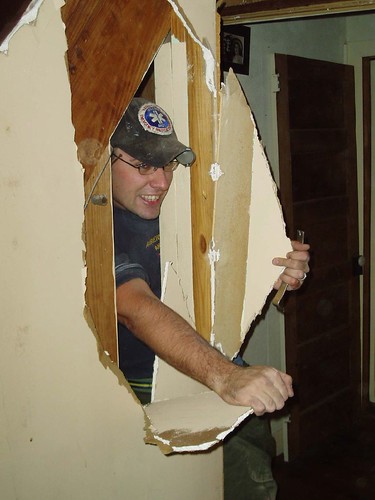
Who says punching your fist through a wall isn't fun?
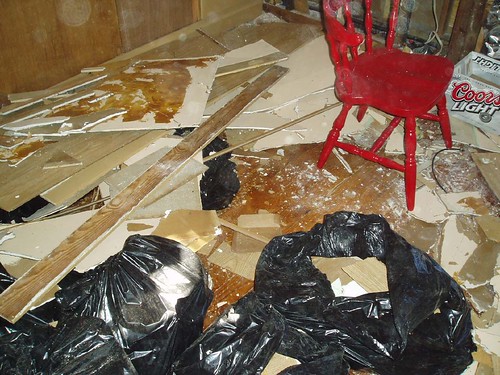
This, times five thousand, came out of our ceiling and off our walls.
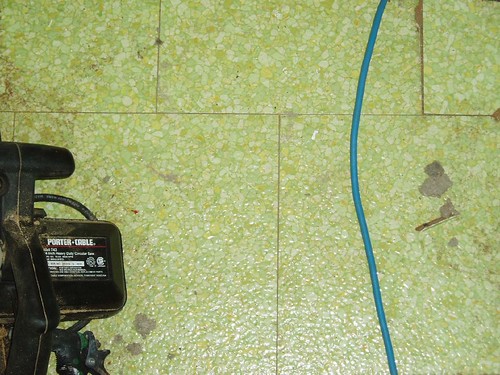
I thought I would never want to see this avocado green linoleum from the bathroom again, but now I gleefully stare at the photo and shout, "You are GONE! Bye-bye!"
This is the hole Al cut in the floor to ease the pouring of the concrete to support the new foundation posts. Yeah, that bathrug? It didn't survive. That's okay. The bathroom is next on the list to be renovated from top to bottom, and we'll get a nice one, then.
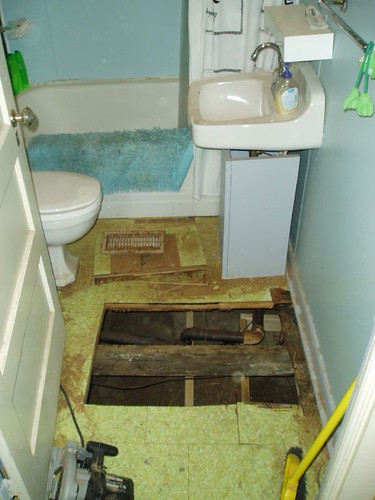
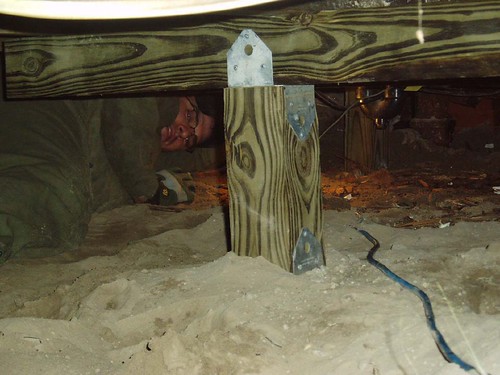
Here's Al with some of his handiwork. Do you SEE how nice that new beam/floor joist/whatever-it's-called is? Do you KNOW how nice it is to have a level floor where once there was a four-inch difference across the room and every time I took a bath, I was certain the tub would crash through the rotted floor in the middle of the bath?
All hail my husband, the lifter of houses.
This is how we intended to tile the floor. And I still think it would have been lovely. But even after all that work and the pouring of leveling compound, the bathroom floor still is a bit wavy, and we decided the tiles would crack too easily.
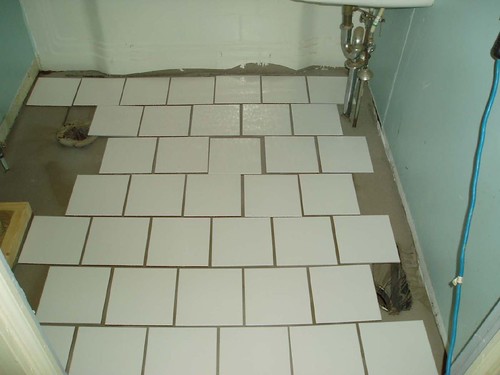
So we did this instead.

And all that time I was afraid to carry the boxes of tile, for fear I'd drop one and the tiles would crack into a thousand tiny little pieces. (The grout still needs to be cleaned up a bit, but it will be a while before the bathroom is totally renovated, anyway). By the way, that's our new toilet. It flushes with just one finger. Not only that, but the seat is a fancy schmancy seat, and if you tap it ever so lightly, it closes ever so slowly, all by itself. I spent a good 15 minutes tapping it and watching the seat go down with a quiet whisper, whoooooooooooooosh, and I am not ashamed to admit that.
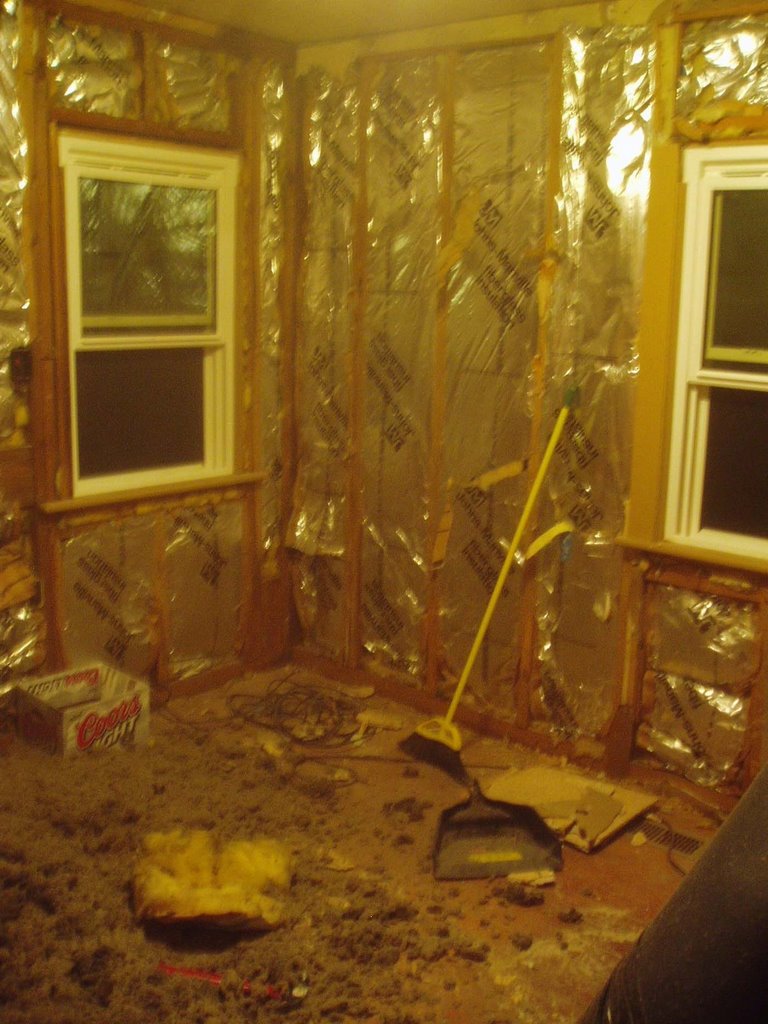
When the ceiling in the office came down, we learned that the attic floorboards above are made of recycled materials:
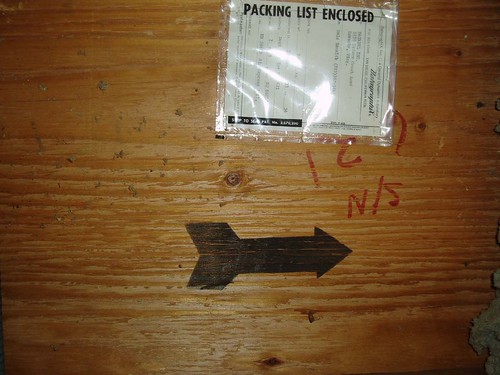
I left the packing list there for the discovering pleasure of anyone who might someday redo this office again.
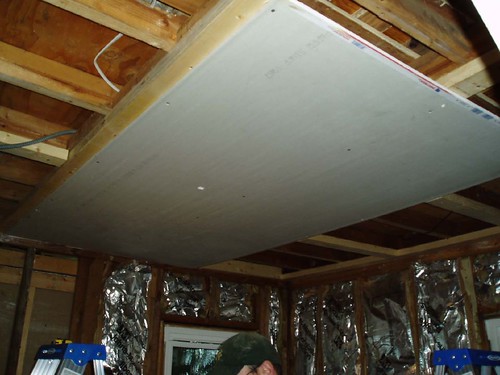
This was the first piece of drywall to go up:
Then followed many days of effort -- sweat, tears, frustration and satisfaction -- with a little help from my friends (sorry, it's the only photo I've got, Laurie and Jess):

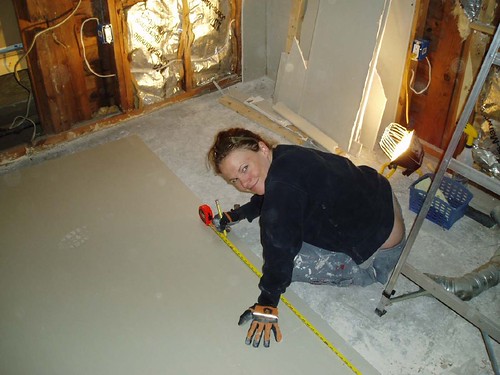
Here's me, measuring drywall with my 24-year-old big yellow Brownie pencil (I knew I would need it someday), right about where my painting chair used to be:
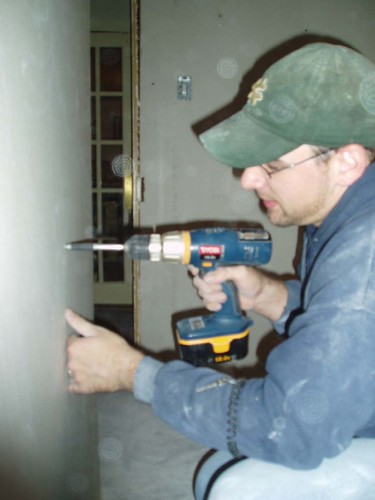
And yesterday, last night around 7, precisely, Al put the last piece of drywall in (well, not technically, because there's a small piece to put in the closet after all the flooring comes out of there, but it certainly FELT like the last piece to me):
So, what did we accomplish?
We gutted the office, raised the foundation (which involved much concrete pouring and heavy lifting on Al's part), replaced the bathroom floor, leveled the floors (150 square feet?) with leveling compound, tiled the bathroom floor, installed a new toilet (worthy of an entire blog entry in istelf), and put up new drywall in the office.
We still must: tape, mud, prime and paint the drywall in the office, put up the new ceiling fan-light fixture in the office (if, that is, the ceiling isn't too low), and install our new bamboo wood flooring in the office and hallway.
I apologize to anyone who has emailed or called in the last week and is waiting to hear back from me. Please bear with me. We'll be working in the evenings for the rest of this week, too, and probably next weekend, and then, we hope, we can put all the furniture back in place, and get back to a semblance of normal life. Until, that is, we renovate the bathroom.
The 9 days we had set aside to fix our foundation, gut the office/studio and refinish it, and replace the bathroom floor have passed, and we have accomplished ALMOST everything we intended to do. We would most likely be done -- we were two days ahead at one point -- but I got very sick early on, and missed about two days, and was only at 50 percent for another day or two.
Here's a sample of our progress. The rest of the photos are here.
At the beginning, there was a cart. And then there were five carts.
Who says punching your fist through a wall isn't fun?
This, times five thousand, came out of our ceiling and off our walls.
I thought I would never want to see this avocado green linoleum from the bathroom again, but now I gleefully stare at the photo and shout, "You are GONE! Bye-bye!"
This is the hole Al cut in the floor to ease the pouring of the concrete to support the new foundation posts. Yeah, that bathrug? It didn't survive. That's okay. The bathroom is next on the list to be renovated from top to bottom, and we'll get a nice one, then.
Here's Al with some of his handiwork. Do you SEE how nice that new beam/floor joist/whatever-it's-called is? Do you KNOW how nice it is to have a level floor where once there was a four-inch difference across the room and every time I took a bath, I was certain the tub would crash through the rotted floor in the middle of the bath?
All hail my husband, the lifter of houses.
This is how we intended to tile the floor. And I still think it would have been lovely. But even after all that work and the pouring of leveling compound, the bathroom floor still is a bit wavy, and we decided the tiles would crack too easily.
So we did this instead.
And all that time I was afraid to carry the boxes of tile, for fear I'd drop one and the tiles would crack into a thousand tiny little pieces. (The grout still needs to be cleaned up a bit, but it will be a while before the bathroom is totally renovated, anyway). By the way, that's our new toilet. It flushes with just one finger. Not only that, but the seat is a fancy schmancy seat, and if you tap it ever so lightly, it closes ever so slowly, all by itself. I spent a good 15 minutes tapping it and watching the seat go down with a quiet whisper, whoooooooooooooosh, and I am not ashamed to admit that.
When the ceiling in the office came down, we learned that the attic floorboards above are made of recycled materials:
I left the packing list there for the discovering pleasure of anyone who might someday redo this office again.
This was the first piece of drywall to go up:
Then followed many days of effort -- sweat, tears, frustration and satisfaction -- with a little help from my friends (sorry, it's the only photo I've got, Laurie and Jess):
Here's me, measuring drywall with my 24-year-old big yellow Brownie pencil (I knew I would need it someday), right about where my painting chair used to be:
And yesterday, last night around 7, precisely, Al put the last piece of drywall in (well, not technically, because there's a small piece to put in the closet after all the flooring comes out of there, but it certainly FELT like the last piece to me):
So, what did we accomplish?
We gutted the office, raised the foundation (which involved much concrete pouring and heavy lifting on Al's part), replaced the bathroom floor, leveled the floors (150 square feet?) with leveling compound, tiled the bathroom floor, installed a new toilet (worthy of an entire blog entry in istelf), and put up new drywall in the office.
We still must: tape, mud, prime and paint the drywall in the office, put up the new ceiling fan-light fixture in the office (if, that is, the ceiling isn't too low), and install our new bamboo wood flooring in the office and hallway.
I apologize to anyone who has emailed or called in the last week and is waiting to hear back from me. Please bear with me. We'll be working in the evenings for the rest of this week, too, and probably next weekend, and then, we hope, we can put all the furniture back in place, and get back to a semblance of normal life. Until, that is, we renovate the bathroom.
Subscribe to:
Posts (Atom)


